Getting Started

After you have installed ROES onto your computer, follow these steps below to get started.

1. Home Screen
Under the ‘Start’ tab you’ll find the Home Screen.
Here you’ll find our Monthly Specials, as well as the Log In portal.

A screenshot of an online photo printing service webpage featuring promotional ads for canvas wraps and photo books, with images of a sleeping baby, a rolled-up photo book, and open photo albums, along with discount details.

2. Log In
Enter your Log In information found in your Welcome Email here.
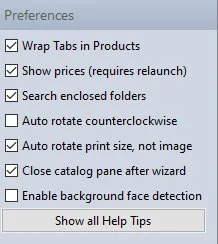
Screenshot of a form titled 'My Information' with fields for Studio Name, Name, GTA Account number, E-Mail Address, Address, City, State dropdown, Postal/Zip Code, and Phone number.

3. Preferences
Ensure your Preference settings match what is seen here.

Screenshot of software preferences settings, including options for wrapping tabs, showing prices, searching folders, auto-rotating views, closing catalog, and enabling background face detection.

4. Start Ordering
On the top of the window you’ll find the navigation tabs. Click on ‘Start Ordering’ to view products and place your order.